Note that the title’s joke only works if you use the correct pronunciation of Godot. 😉
As much as I’ve loved using Godot over the years, one of my biggest pain points had been grappling with positioning UI nodes. I work as a web developer for my day job, so I work regularly with CSS. Compared to that, Godot’s UI didn’t feel intuitive, and anything more complex than full-screen positioning frequently resulted in nodes placing themselves in ways I didn’t expect, and it felt like I spent hours duct-taping an interface together. I scoured whatever documentation I could get my hands on, but nothing seemed to help much in the end.
Recently, however, I’ve had some tremendous breakthroughs in my understanding of how Godot’s UI positioning system works. The result is that I now understand that Godot’s UI is actually very simple to use, almost brilliantly so. Suddenly, I was able to put together complex UI scenes easily, and comprehend why my UI looked the way it did. Given all the frustration I’ve felt over the years, these realizations have felt almost miraculous.
I wanted to codify my newfound knowledge in this blog post. Not only will this be a reference I can look back on to refresh my memory, it will help people struggling with Godot’s UI to gain the perspective I have, and thus make UI work a breeze instead of a hurricane.
This is not a tutorial on how to make good UI, but an explanation of how Godot positions UI nodes. That said, I made a Godot project to help illustrate my points, and I’ve made it available for you to download and reference for your own edification.
The project was originally created in Godot 3.5, but I tested opening it in 4.0 and nothing seems to have changed for the worse. The UI around anchors/margins is different, as called out on Twitter by Jaysen Huculak, but the underlying principles are still the same.
Anchors
Let’s start with the first of the foundational elements of UI positioning: Anchors.
Anchors control the boundaries of where a node and its content are drawn on the screen. The unit of measurement is literally, that: a unit, from 0 to 1. What is the unit’s reference? The parent node’s size, which starts from the pivot (which is the 2D coordinate where the node is “located” in UI coordinate space) and extends across horizontal and vertical axes to the full size of the parent node. 0 means you are at the start of the axis (horizontal for left/right, vertical for top/bottom) and 1 means you are at the end of the axis.
That’s tricky to parse with words alone, so let’s look at some images to illustrate how this positioning system works.
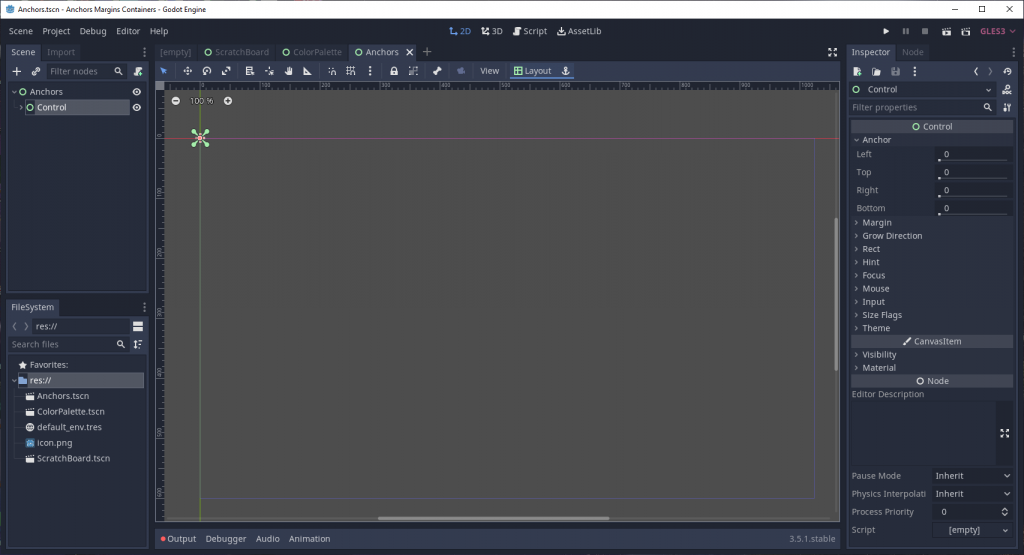
Layout dropdown section.The above is a simple Control node that is the child of another node that fills the entire viewport. Note that all the anchor values have been set to 0. Correspondingly, the node’s size is also zeroed out, so you can’t see anything of that node’s contents.
If you create a Control node with Godot’s editor interface, it will not look like this despite also having 0’s set for the anchors. I’ll explain why later in the article.
Let’s see what happens when we set the right and bottom values to 1 (or 100% of the parent’s size horizontally and vertically).
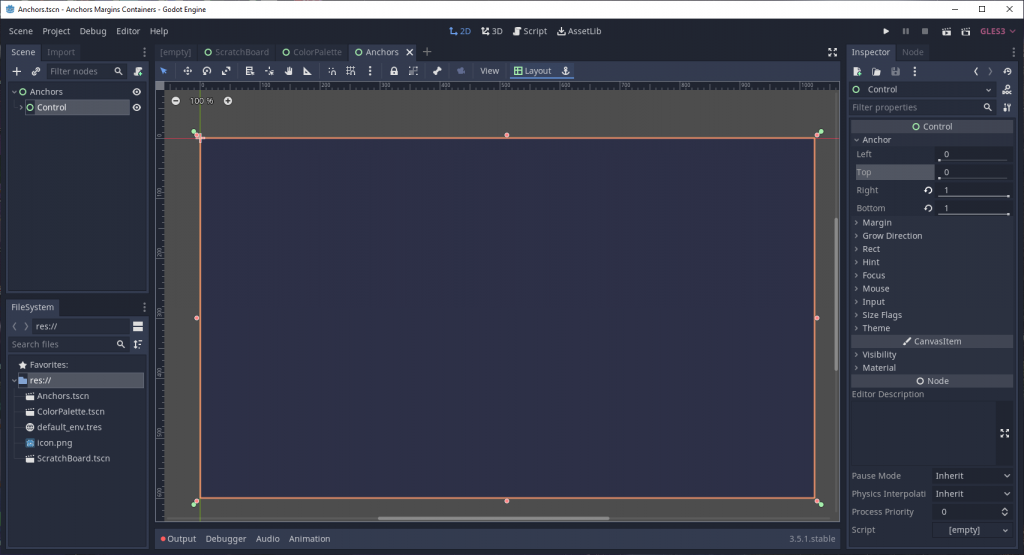
Suddenly, our node stretches fully across the available viewport space. By setting right to 1, we told Godot to expand the right edge of the node all the way across the parent node’s bounding rectangle, across the horizontal axis; it’s the same story with setting bottom to 1, but on the vertical axis of the bounding rectangle, instead.
In Godot 4, the anchors are abstracted behind a helper menu interface. To change the values manually, you have to set the anchors preset to “custom”, which exposes the raw numbers. Thanks to Rob for the comment pointing this out!
Just for fun, let’s change the left and top values to 0.5 and see what happens.
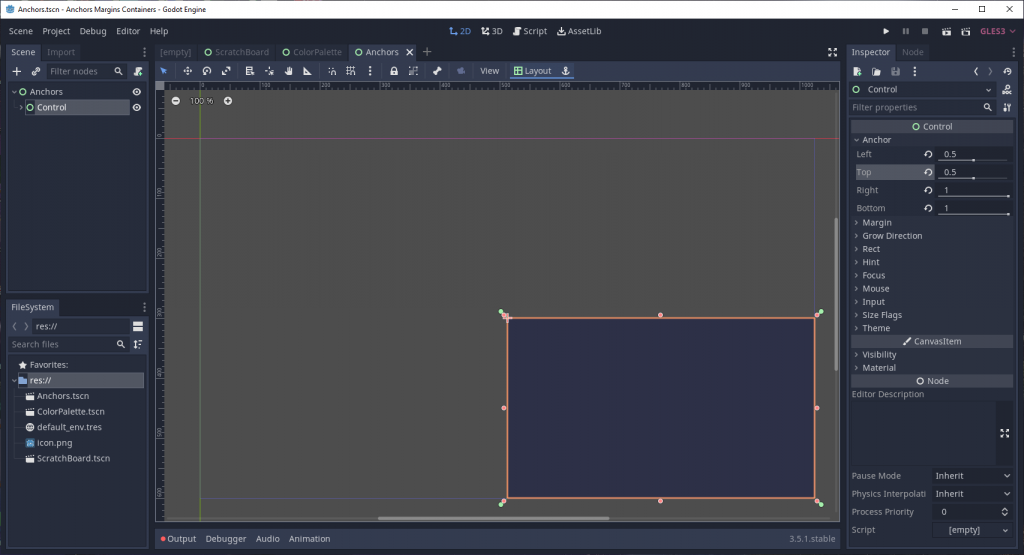
Now our Control node looks like it’s in the lower-right corner of the viewport. Essentially, we told Godot to move the left and top edges of our node 50% away from the parent’s pivot origin.
I’m not showing this in the screenshots, but I placed a
ColorRectwithin theControlto make it more obvious how much space it’s taking up. It’s essentially just filling whatever space ourControlnode is, and isn’t needed in any functional way.
Anchors are just one part of Godot’s UI placement equation. Another critical part of that equation is Margins.
Margins
Margin controls the amount of spacing used from the specified edge. Where Anchors are placed using percentile units, Margins use pixel units.
In Godot 4, margins are called “offsets”. Same concept, different name. Thanks again to Rob for pointing that out!
Let’s take another example Control node, with anchor values right and bottom set to 1.
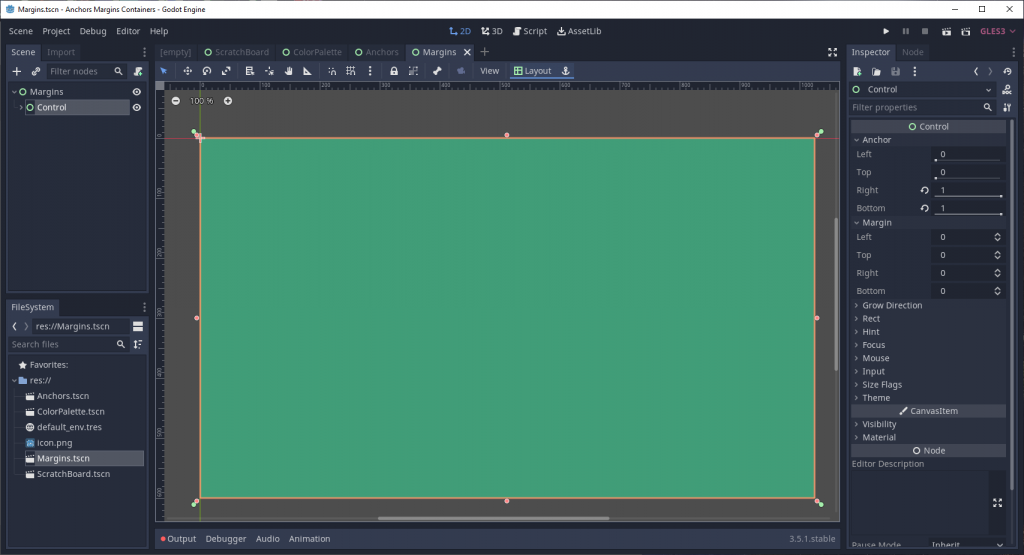
Currently, the viewport is completely filled. Let’s try adding some margin around the Control so that there’s 16px of space around it.
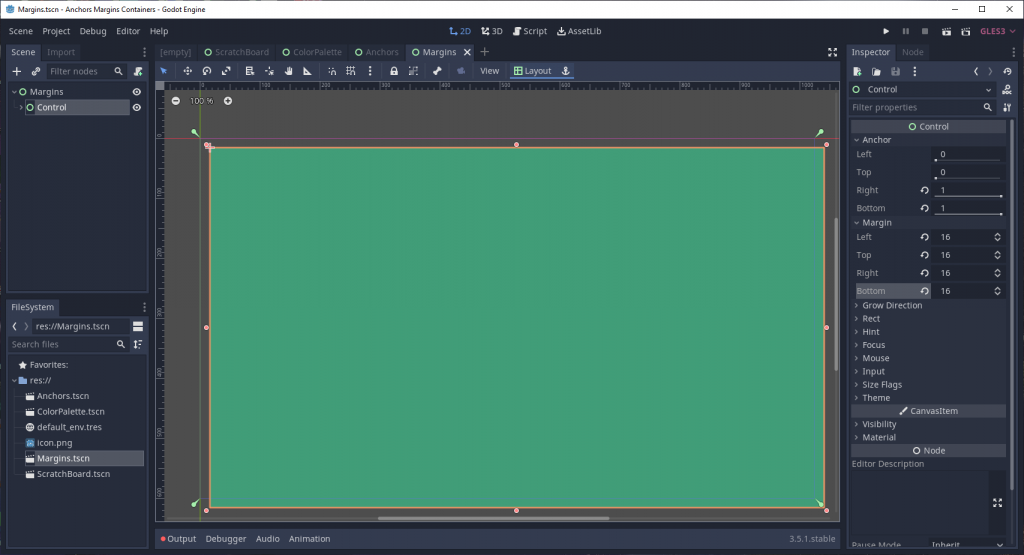
…wait, that doesn’t look right. There’s 16px of space around the top and left of the Control, as we expected, but the bottom and right sides got pushed outside of the viewport’s visible area.
Why did that happen? It’s simple: Godot doesn’t treat margin as distance into the bounding rectangle. Instead, Margin gets applied along an axis of direction; positive margin is to the right/bottom of the specified edge, while negative margin is to the left/top of that edge.
This is different from how margins work in CSS, and is a big reason why I misunderstood Godot’s UI for so long.
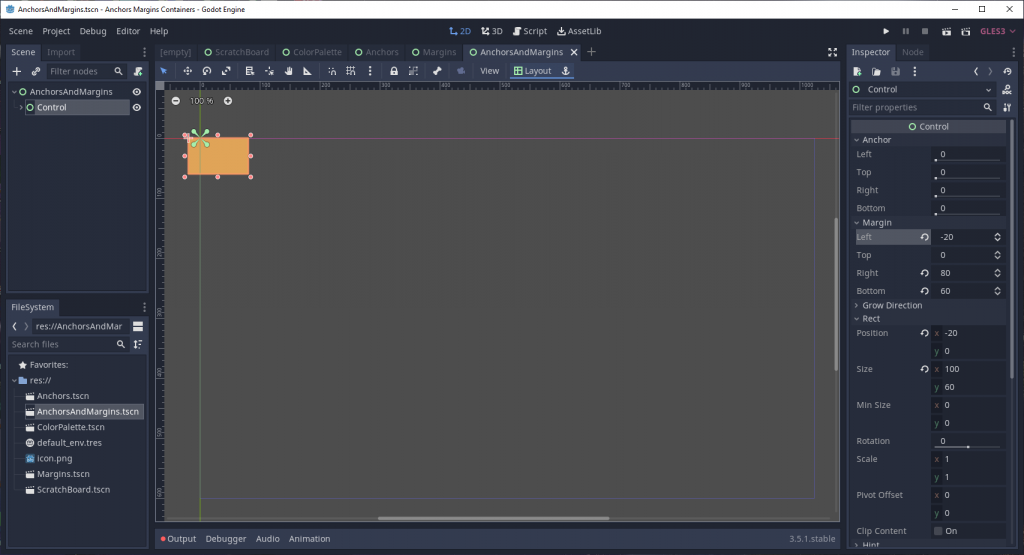
To get the spacing effect we want, we need to apply negative margin values to the bottom and right margins.
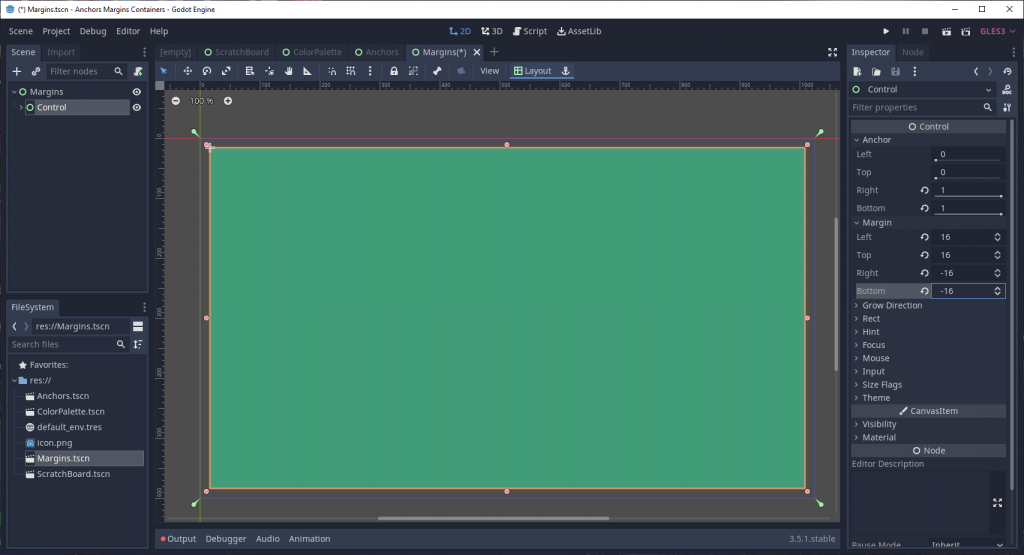
That’s more like it.
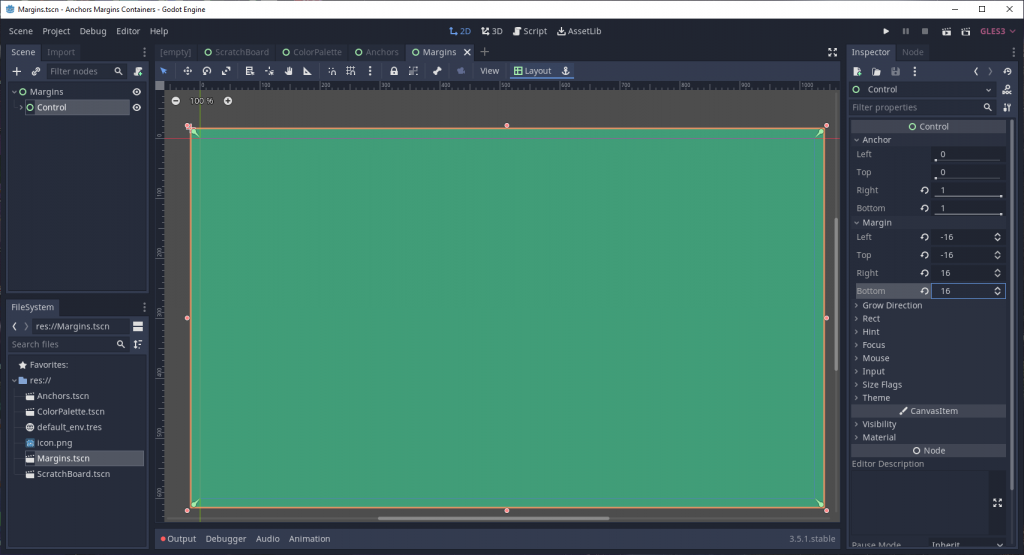
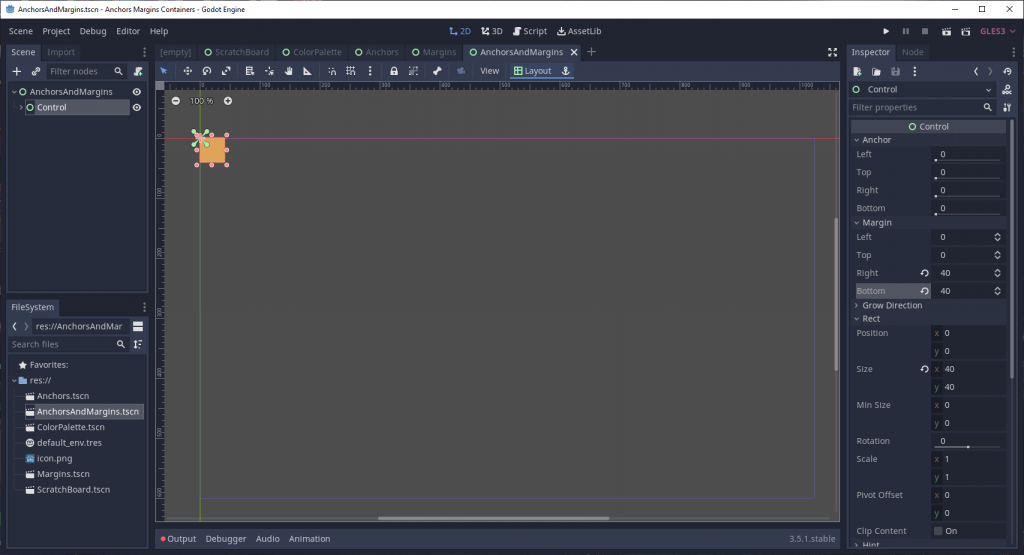
Just for fun, though, what if we wanted to have our Control’s width exceed the bounding rectangle of the containing node? Simple, we just make the left and top margins negative, and the right and bottom margins positive.
Earlier, I glossed over the fact that creating a new Control node in Godot’s editor doesn’t actually create a node with no size, despite anchors being set to 0. That’s because Godot defaults the new Control’s right and bottom margins to 40px, which results in giving them a default rect_size of Vector2(40, 40). I don’t know of official documentation explaining why, but my guess is that this is to try and minimize confusion around why new controls have no size.
Wait, what’s rect_size? How is that related to margin values? Good questions!
How Anchors and Margins Impact Other Control Properties
While Anchors and Margins are the core aspects that determine a node’s position and size, they do so in coordination with other node properties. Changing the anchors and margins of a node will usually automatically adjust these tangential properties, and vice versa.
Let’s go over what these properties are.
Rect Size
The rect_size property is the actual size of the control node. This can be set directly, but often this gets readjusted based on the settings of the anchors and margins. The important thing to remember is that this value always represents the node’s actual size in-game.
Rect Position
rect_position is the point where the control “is” in the game’s UI space (aka it’s point of origin). Like rect_size, this can be set manually, and is also automatically adjusted based on interactions with anchors and margins.
Rect Min Size
The rect_min_size property forces Godot to never shrink this particular node below the specified size. Unlike rect_size and rect_position, this is never adjusted automatically by Godot. It’s useful for when you absolutely need to have a control not shrink below a certain size, but be careful: it’s easy to abuse this property to hack around badly-set UI properties. (I certainly used it this way!)
Layout Presets
At this point, if you’ve worked with Godot’s UI before, you may have realized something: “This feels awfully similar to what happens when I use the Layouts button!”
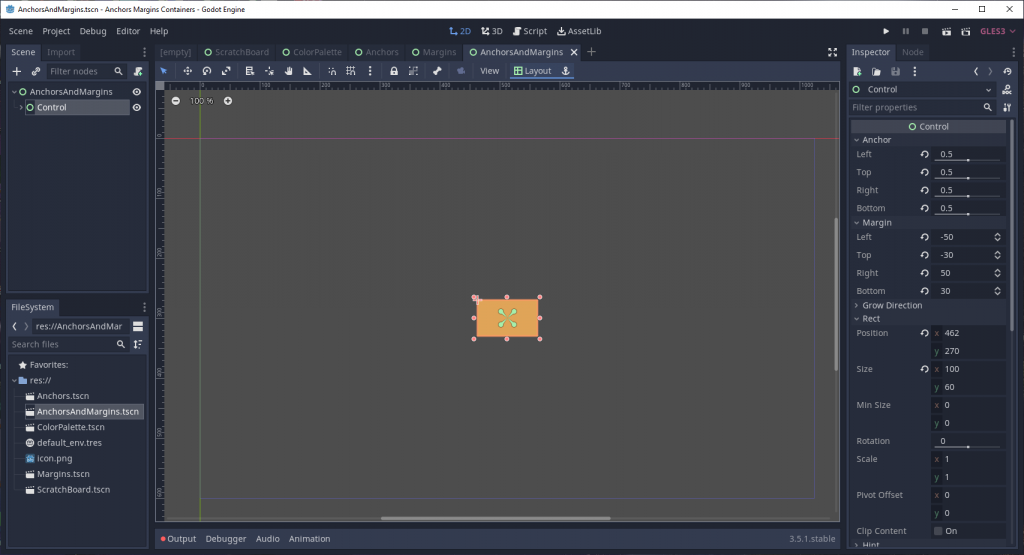
That’s because those Layouts are nothing more than common presets for the anchor and margin values. For example, “Full Rect” is the exact same thing as setting top and left anchors to 0, right and bottom anchors to 1, and all margins to 0. Meanwhile, the “Center” preset sets all anchors to 0.5 (aka 50%) and then automatically calculates the margin values such that they are half of the node’s minimum size, resulting in a centered node.
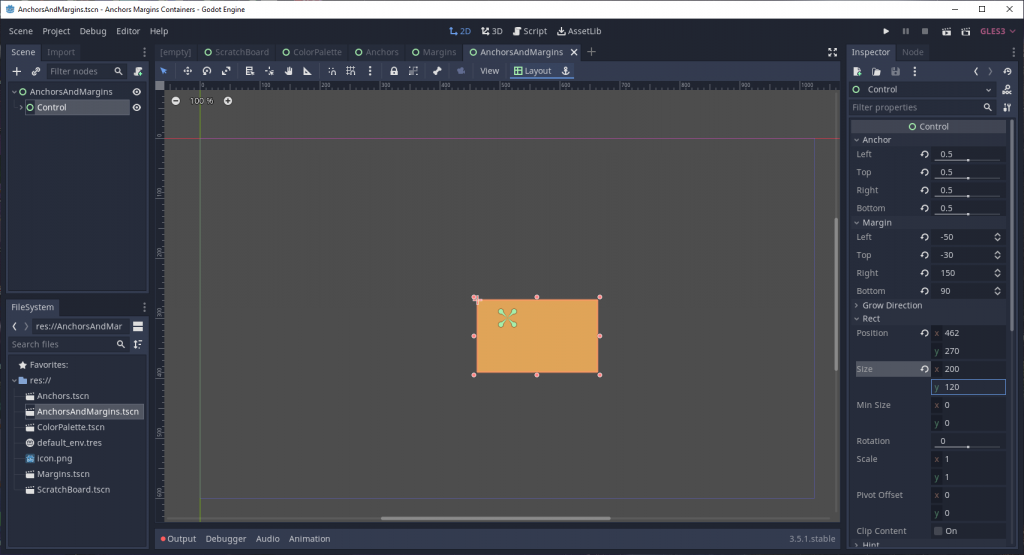
rect_position as well.The presets specified were common enough that Godot’s developers decided to make a convenient way to set them, but it can be confusing when you try to use them without understanding how the underlying system works. I’ve definitely had confusion about why a previously “centered” control wasn’t updated automatically when I did something which changed the node’s size. The reason why is because the presets don’t automatically update in response to changes; they just act on whatever you have architected at the time they get used. Thus, if I change something which affects the node’s size, I need to reapply the “Center” preset to get the node to look centered again.
Child Control Nodes
What happens if you change anchors and margins for a child node? Exactly the same thing as changing those values for its parent! All the examples I’ve used to this point have had nodes be children to a root node that matches the size of the viewport, but the viewport itself is completely irrelevant to the sizing of nodes. If you have a sized control, and adjust the anchor and margin values of its children, they will fit within that parent control’s space.
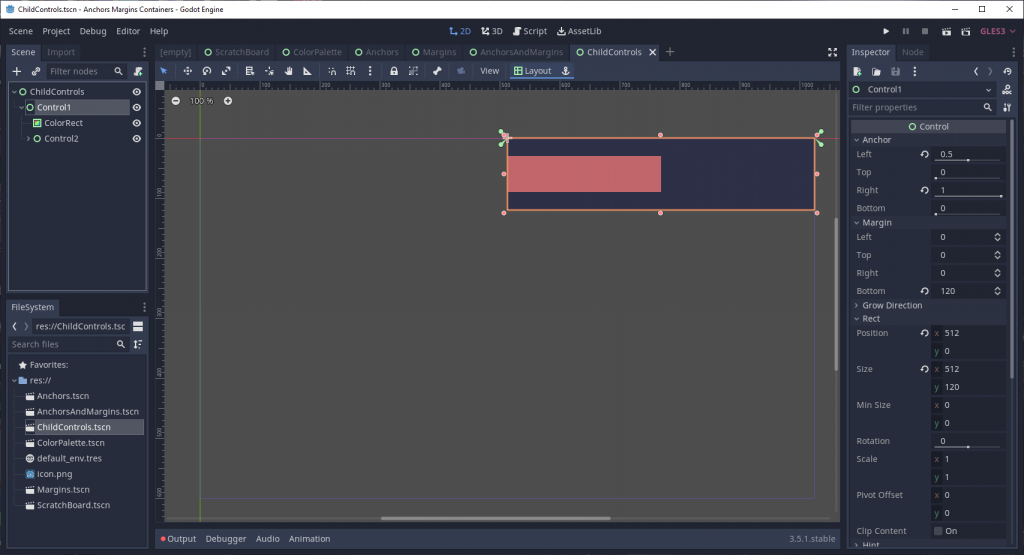
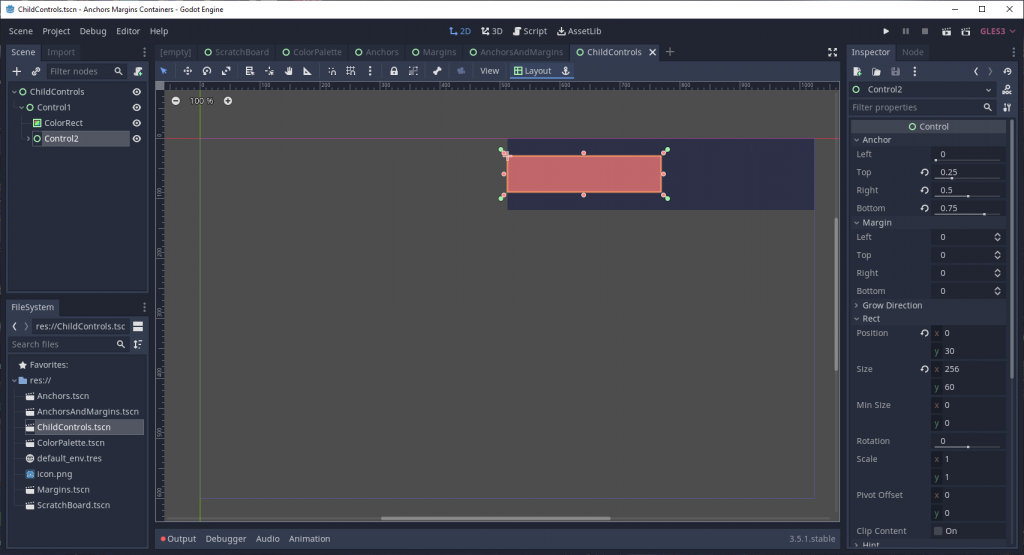
That’s incredibly powerful and predictable, to have a UI system which functions the same for every Control-based node in Godot.
Well, almost all nodes…
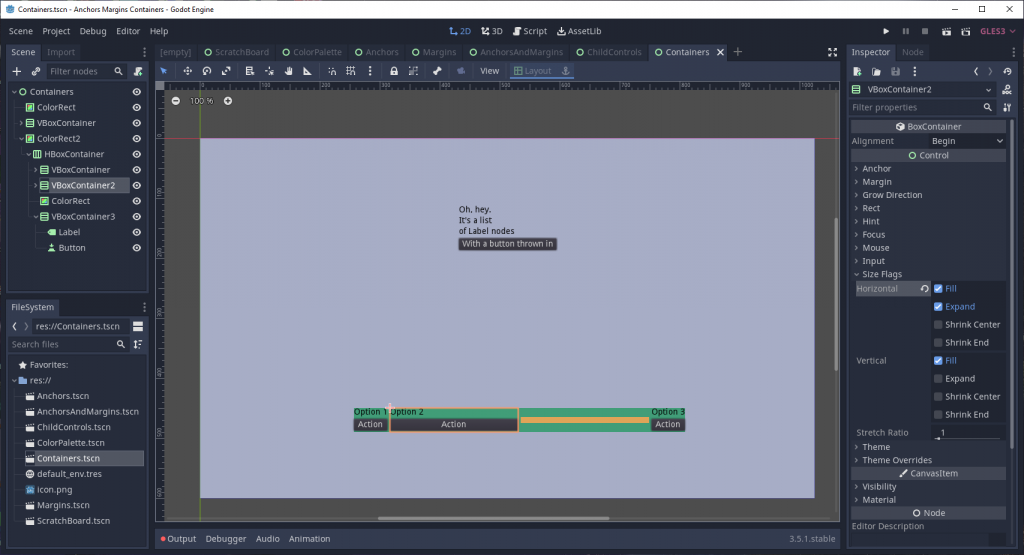
Container Nodes are Exceptions
There is a class of node in Godot called a Container. Container nodes themselves can be sized with anchors and margins, just like any other node. However, the children of container nodes get automatically sized and positioned by that container’s internal logic, ignoring (and overwriting) any manually-set size and position values.
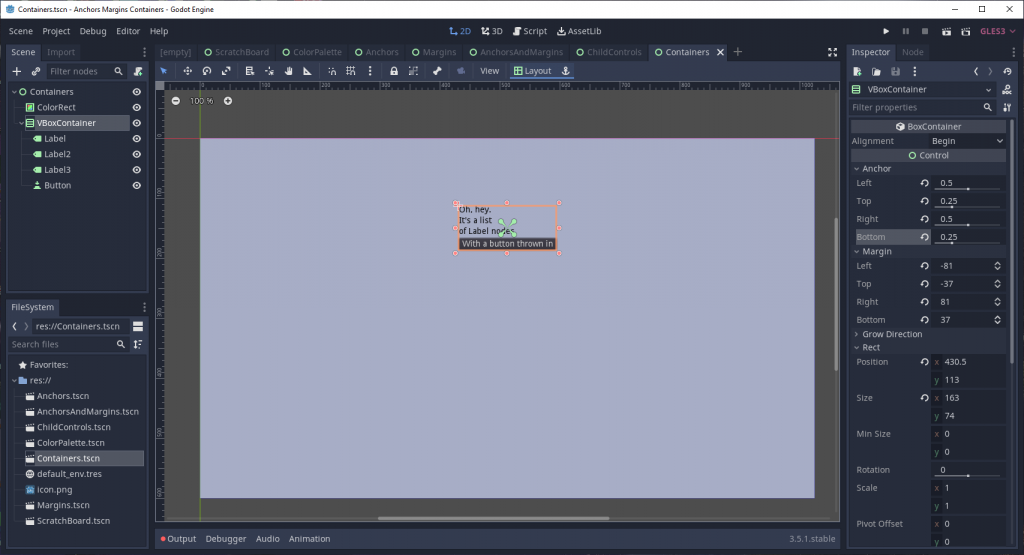
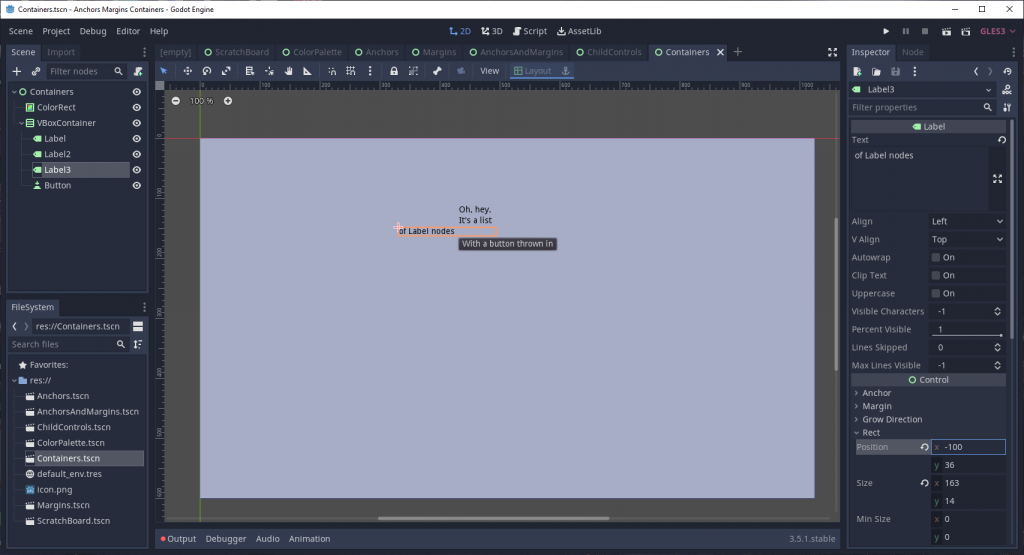
rect_size of nodes within a Container-based node, those values will be automatically adjusted by the container node.There are multiple kinds of Container nodes, each with their own internal logic for how children size and position are handled. To give a few examples:
HBoxContaineraligns its children horizontally.VBoxContaineraligns its children vertically.GridContaineraligns its children within a set grid of columns.CenterContainercenters all direct children to its own center.
Godot’s documentation does call out this behavior, and the layout presets are disabled when working within container nodes (the latter behavior to prevent developers from using them in places where they simply won’t work). If you hadn’t understand how the UI system works overall, like me, then these explanations and behaviors may have felt more like descriptions rather than elucidations.
Size Flags
You do still have some control over the placement and sizing of nodes within a Container, through size flags. Size flags have four types of behavior, for both horizontal and vertical axes (all of which can individually be turned on or off).
fill causes the node to fill the space given to it. That space is governed by both the parent container’s size and the node’s own calculated size.
expand causes the node to fill any space within the parent container not already used by another node. If neighboring nodes are not set to expand, they get pushed by ones that do. If adjacent nodes both expand, they split the space between them.
shrink center causes the node to occupy only its minimum possible size, while also centering its own position relative to its neighbors and its parent container.
shrink end is the same as shrink center, but with the position at the end of the available space instead of the center.
Not setting any of the above flags makes the node act as though a shrink begin property existed.
The important thing to remember with positioning nodes within containers is to not worry about getting the nodes in a specific position or size, but to get them aligned according to whatever ratio you’re trying to achieve. The advantage of this approach is that you can place container nodes anywhere within the UI, and they will automatically take care of placing and sizing their children to match that same ratio.
Why Won’t My Control Node Behave in a Container
Have you ever tried to put a Control node in a Container node and it behaved like this?
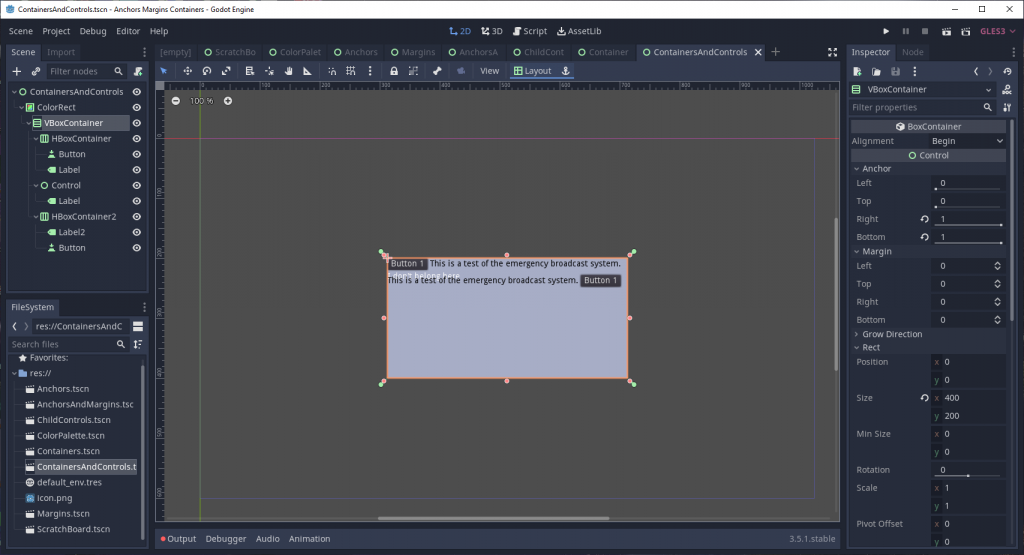
At first glance, it seems like the Container isn’t size-managing the Control, but that’s not actually the case. The truth is that Control nodes, by default, do not adjust themselves based on the size of their own children. (In other words, Control nodes are not Containers!) In fact, the Control node is resized by the Container, but since the Control isn’t expanding to the size of its children its own size is getting set to 0.
There are two ways to get more expected behavior. One is to put a rect_min_size on the Control node so there is something for the Container to resize.

The other way is to use the Control node’s size flags.
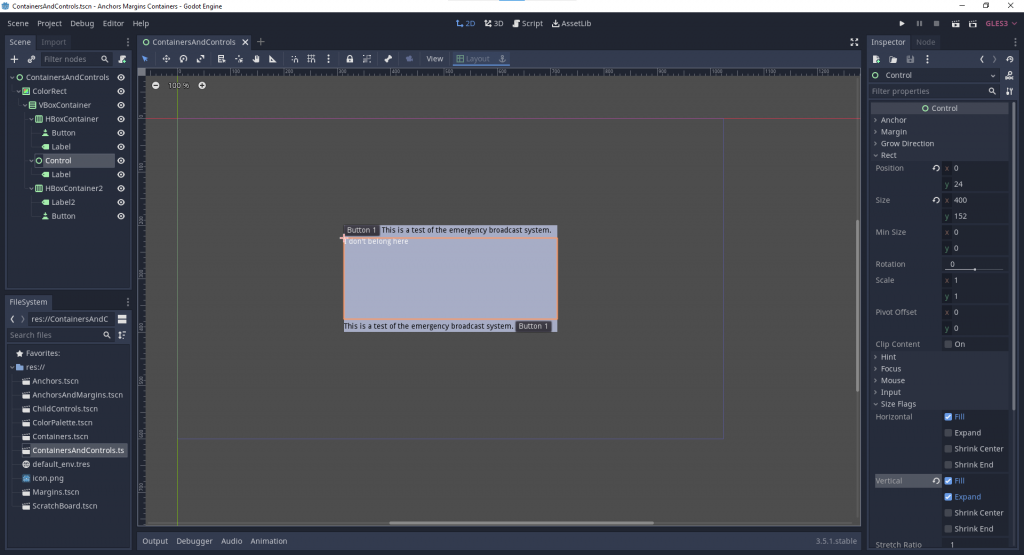
Which one should be used? It will depend on the effect you’re trying to achieve. If you just need the node to occupy space, a rect_min_size should do the trick. For more dynamic size adjustment, changing the size flags works best.
Conclusion
This is how Godot’s UI sizing and positioning system works: Anchors, Margins, and Containers. Now that I understand this, I’ve had a much easier time crafting UI that is placed exactly how I want it to be. The system is simple, but until I grokked how it works it felt confusing and unintuitive.
Hopefully, this post helps you better understand Godot’s UI as well!
ColorRect nodes I used for visualization throughout the examples. It doubles as a nifty display of what you can accomplish with Godot’s UI!
Donn
2023-05-19 at 3:37 amWhat a great little article. Thank you! Much appreciated. Wish it was in the Godot docs, frankly.
Josh Anthony
2023-05-24 at 4:17 pmThank you!
I agree, something like this would be useful in the docs; the lack thereof was exactly why I wrote it.
wuukong
2023-07-31 at 12:54 amWhen I am confused about how to understand the anchor and margin in godot, I came across this article. How wonderful! Thank you!
Josh Anthony
2023-08-03 at 8:58 pmYou’re welcome! Glad it helped you.
Rob
2023-12-02 at 11:15 pmGreat article. I needed to do a tad bit of digging around in Godot 4 to find the properties.
Needed to set “Anchors Preset” to “Custom” to be able to manually set the anchors, and margins (now known as offsets).
They’ve all been renamed and moved but the concepts still apply! Thanks so much!
Josh Anthony
2023-12-07 at 9:53 pmThank you! Good callout on setting the anchors/margins to custom, I’ll make note of that in the article.