Welcome to Part 3 of my tutorial for creating a debugging interface in Godot! In Part 1, we created the base for our debugging system, and in Part 2 we created debug widgets to show our debugging information. If you haven’t read those parts, you would be advised to do so before continuing on with this part. Alternatively, if you want to start from this part, and just need the end code from the preceding parts, you can check out the tutorial-part-2 branch from the Github repo.
At this point, we have a debugging interface that we can toggle on and off, and we have a base DebugWidget class to build our debug widget from, as well as a DebugTextList debug widget. We don’t quite have everything we’d ideally want in a debugging system, though. What happens if we want to display different debug widgets, and not have to see all of them at the same time? What if we have a lot of debug widgets, so much so that they take up most of the screen space, making it impossible to see the underlying game beneath the cluttered visuals?
We could try creating multiple DebugLayer nodes, but this would quickly become brittle and clunky. As the DebugLayer is exposed globally for our code to access, any additional DebugLayer nodes would also need to be global, which would pollute the AutoLoad declarations. It would also mean having to remember which DebugLayer you’re connecting to, as well as assigning different keys to show and hide each layer so that they don’t all show at the same time… Suffice it to say, doing things this way is awful.
It would be better to create a system specifically for showing different debugging interfaces, depending on whatever criteria we choose to specify. We’ll do this by creating a new type of node, the DebugContainer, and modifying DebugLayer to be capable of managing multiple DebugContainer nodes.
If you want to see the final result, you can check out the tutorial-part-3 branch in the Github repo.
Ready? Let’s go!
Creating the DebugContainer
Begin by creating a new script file, DebugContainer.gd, in the _debug directory. Have it extend MarginContainer. We’ll begin by adding this line of code:
# The list of widget keywords associated with the DebugContainer.
var _widget_keywords = {}
Wait a minute, you say. That looks suspiciously like the code we added to DebugLayer.gd in the previous part of this tutorial. Well, you’re right! That’s exactly what it is. Our goal is to move management of individual DebugWidget nodes out of DebugLayer and into DebugContainer nodes, so it makes sense to go ahead and store the widget keywords here.
Moving Widget Code from DebugLayer to DebugContainer
In fact, we’re going to move most of the code we added to DebugLayer for managing debug widgets into DebugContainer.gd. Let’s take care of that right now:
func _ready():
    mouse_filter = MOUSE_FILTER_IGNORE
    _register_debug_widgets(self)
    Debug.register_debug_container(self)


# Adds a widget keyword to the registry.
func _add_widget_keyword(widget_keyword: String, widget_node: Node) -> void:
  var widget_node_name = widget_node.name if 'name' in widget_node else str(widget_node)

  if not _widget_keywords.has(widget_node_name):
    _widget_keywords[widget_node_name] = {}

  if not _widget_keywords[widget_node_name].has(widget_keyword):
    _widget_keywords[widget_node_name][widget_keyword] = widget_node
  else:
    var widget = _widget_keywords[widget_node_name][widget_keyword]
    var widget_name = widget.name if 'name' in widget else str(widget)
    push_error('DebugContainer._add_widget_keyword(): Widget keyword "' + widget_node_name + '.' + widget_keyword + '" already exists (' + widget_name + ')')
    return


# Go through all children of provided node and register any DebugWidgets found.
func _register_debug_widgets(node) -> void:
  for child in node.get_children():
    if child is DebugWidget:
      register_debug_widget(child)
    elif child.get_child_count() > 0:
      _register_debug_widgets(child)


# Register a single DebugWidget to the DebugContainer.
func register_debug_widget(widgetNode) -> void:
  for widget_keyword in widgetNode.get_widget_keywords():
    _add_widget_keyword(widget_keyword, widgetNode)


# Sends data to the widget with widget_name, triggering the callback for widget_keyword.
func update_widget(widget_path: String, data) -> void:
  var split_widget_path = widget_path.split('.')
  if split_widget_path.size() == 1 or split_widget_path.size() > 2:
    push_error('DebugContainer.update_widget(): widget_path formatted incorrectly. ("' + widget_path + '")')

  var widget_name = split_widget_path[0]
  var widget_keyword = split_widget_path[1]

  if _widget_keywords.has(widget_name) and _widget_keywords[widget_name].has(widget_keyword):
    _widget_keywords[widget_name][widget_keyword].handle_callback(widget_keyword, data)
  else:
    push_error('DebugContainer.update_widget(): Widget name and keyword "' + widget_name + '.' + widget_keyword  + '" not found (' + str(_widget_keywords) + ')')
Almost all of the code above is code we worked on in Part 2 of this tutorial. If you need any refreshers on how that code works, feel free to review that part.
There are a couple of differences to the code that need to be pointed out; both are in the _ready() function. First, the mouse_filter = MOUSE_FILTER_IGNORE line.
By default, mouse_filter is equal to MOUSE_FILTER_PASS. That value means that, when you render a UI node, mouse interactions are captured by the first UI element that decides to handle it. If you have two UI nodes, and you click on that stack, the “top” node will receive the mouse event first. If it doesn’t handle the event, it gets passed to any nodes below it. If it does do something with the event, however, then the event is considered to be handled, and is no longer passed on to other nodes.
With that information, let’s think about how our debugging system is implemented. We made DebugLayer a CanvasLayer node that is rendered at the highest level possible. Because of this, anything in DebugLayer will receive mouse events before anything else in the game. Since control nodes default to using the MOUSE_FILTER_PASS setting, that means DebugLayer will consume any mouse events while it is being shown, preventing interaction with the underlying game. That is behavior we definitely don’t want. That is why we set mouse_filter to MOUSE_FILTER_IGNORE for DebugContainer, so that it will ignore any mouse events, allowing them to proceed down to the underlying game nodes.
The other thing to note about the code we’re adding is the call to Debug.register_debug_container(). This will be how our debug container registers itself with the DebugLayer, much like what we did with debug widgets in the previous part of the tutorial.
If you’re copying code over from your project, don’t forget to update the error messaging and code documentation to say
DebugContainerinstead ofDebugLayer.
Modifying DebugLayer to use DebugContainers
We’re going to need to add register_debug_container() to DebugLayer.gd. Before we do so, however, we need to make some other changes to the DebugLayer scene, itself:
- Remove the
TextList1node we created in the previous tutorial; we’re no longer going to store debug widgets directly in theDebugLayerscene. - Select the
DebugUIContainernode, click on the Layout tab, and select “Full Screen”. - Add a
VBoxContainerchild toDebugUIContainer. - Add a
Tabsnode and aMarginContainernode as children of theVBoxContainer(in that order). - Name those last two nodes
DebugTabsandDebugContentContainer. - Go to the
DebugTabsnode properties and set Tab Alignment toleft.
That takes care of the scene. Let’s move on to modifying the script. If you haven’t done so already, remove the code implementing debug widgets in DebugLayer (aka the stuff we moved into DebugContainer). Once that’s done, add the register_debug_container() function and the related code that is part of its implementation:
signal debug_container_registered


# The debug containers registered to the DebugLayer.
var _debug_containers = {}

# The currently active debug container.
var _debugContainer: Node

# Nodes implementing the debug container tab switching interface.
onready var debugTabs = $DebugUIContainer/VBoxContainer/DebugTabs
onready var debugContentContainer = $DebugUIContainer/VBoxContainer/DebugContentContainer


func _input(_event) -> void:
  if Input.is_action_just_pressed('toggle_debug_interface'):
    # ...existing code
    _debugContainer.show()


func register_debug_container(containerNode) -> void:
  var container_name = containerNode.name
  if _debug_containers.has(container_name):
    push_error('DebugLayer.register_debug_container: Debug already has registered DebugContainer with name "' + container_name + '".')
    return

  # Reparent the container node to the DebugLayer.
  containerNode.get_parent().call_deferred('remove_child', containerNode)
  debugContentContainer.call_deferred('add_child', containerNode)
  debugTabs.add_tab(container_name)

  _debug_containers[container_name] = containerNode
  if _debug_containers.size() == 1:
    _debugContainer = containerNode

  # Hide this container node so we don't show debug info by default.
  containerNode.hide()

  emit_signal('debug_container_registered', containerNode)
That’s quite a chunk of code. Let’s unpack this and see what everything does.
First, we add a signal, debug_container_registered, which we’ll dispatch whenever a debug container is registered. Next, we add _debug_containers, which will be used the same way that we used _debug_widgets, just for debug containers instead of debug widgets. We also add _debugContainer to keep track of the currently shown debug container’s node.
We define references for two of the UI nodes we added to the DebugLayer scene, debugTabs and debugContentContainer. For now, we’ll ignore these in favor of explaining other parts of the added code. Don’t worry, we’ll explain what these nodes are used for as we progress through the tutorial.
Continuing on, we modify our _input() function to show the current debug container node whenever we toggle on the debug interface. And finally, at long last, we have the register_debug_container() function, itself.
In register_debug_container(), we first get the name of the passed-in containerNode and check to see if that name is already registered; if it is, we show an error and return without doing anything else. Next, we need to reparent the containerNode from wherever it currently is in the scene tree to become a child of debugContentContainer. Note the use of call_deferred(), rather than invoking the functions directly; this calls the specified functions during Godot’s idle time, which prevents issues that can occur when running code within nodes that are being reparented.
We’re going to allow
DebugContainernodes to be added pretty much wherever we want when creating our scenes, so we need to move them inside theDebugLayerat runtime to ensure they get displayed as part of the debugging interface. This should make more sense once we get to the part where we start using debug containers.
After the reparenting is finished, we add a new tab to the DebugTabs node, entitled the debug container’s name. Then we add the containerNode to the dictionary of debug containers; if it’s the first debug container we’ve registered, we set it to be the initially-shown debug container. We want to make sure that our debug containers aren’t visible by default (otherwise, we’ll see every debug container all at once), so we call hide() on the containerNode. Finally, we emit the debug_container_registered signal, so anything that wants to listen for that will know when a debug container is registered, and which one it is.
I have not needed to make use of this signal yet in my personal use of the debugging system, but it seems like a potentially useful thing to expose, so it makes sense to go ahead and do so.
Now that we’ve implemented the register_debug_container() function, it’s time to take a closer look at the DebugTabs node and make it work.
DebugTabs
The Tabs node in Godot is a basic tabs implementation. It does no view switching by itself; instead, when we switch between tabs, a signal is fired indicating which tab was switched to, and it’s up to our code to listen for that signal and respond to it. We’re going to use this functionality to change which debug container is the one being shown in DebugLayer.
Godot does provide a
TabsContainernode, which would implement both the tabs and view switching. However, since it is a single node, if you ignore mouse events (as we mentioned needing to add forDebugContainer), then you can’t click on the tabs. If you leave the node able to capture mouse events, it will prevent interacting with the game when the debug interface is open. Thus, I’ve opted to just use theTabsnode and implement view switching manually.
The code to implement the view switching is rather simple:
func _ready() -> void:
  # ...existing code
  debugTabs.connect('tab_changed', self, '_on_Tab_changed')


func _on_Tab_changed(tab_index) -> void:
  var tab_name = debugTabs.get_tab_title(tab_index)
  var containerNode = _debug_containers[tab_name]
  _debugContainer.hide()
  _debugContainer = containerNode
  _debugContainer.show()
During _ready(), we connect to the tab_changed signal for debugTabs and provide an _on_Tab_changed() callback. In the callback, we get the name of the tab (based on the tab_index provided as the callback function’s argument), and use that name to find the registered debug container with matching name. We then hide the currently-visible debug container, switch the _debugContainer variable to be the upcoming containerNode, and then make that debug container visible.
Updating Widgets
We’re still missing one important functionality: sending data to update our debug widgets. Since we moved our previous implementation of update_widget() into the DebugContainer node, we’ll need to create a new version of update_widget() that determines which debug container the widget data should be sent to.
# Sends data to the debug container specified in widget_path.
# API: container_name:widget_name.widget_keyword
func update_widget(widget_path: String, data = null) -> void:
  var split_keyword = widget_path.split(':')
  if split_keyword.size() == 1:
    push_error('DebugLayer.update_widget(): No container name was specified. (' + widget_path + ', ' + str(data) + ')')
    return

  var container_name = split_keyword[0]
  if not _debug_containers.has(container_name):
    push_error('DebugLayer.update_widget(): Container with name "' + container_name + '" is not registered.')
    return

  var containerNode = _debug_containers[container_name]
  widget_path = split_keyword[1]
  containerNode.update_widget(widget_path, data)
Notice that the arguments are still the same: we’re passing in a widget_path and data. However, we need a way to indicate which debug container has the debug widget we want to update.
To do this, we’re going to modify the widget_path API slightly. Instead of starting the string with the name of the debug widget, we’ll start with the name of the debug container, and delimit it with a colon, :.
We implement this in code by splitting the widget_path string on said colon and verifying that there was indeed a debug container name passed in. If no container name was provided, then we show an error and return without doing anything further; we do the same if the provided debug container’s name doesn’t exist in our dictionary of registered debug containers. If all is valid, then we get the specified debug container and call its update_widget() function, passing in the other half of our split string (aka the original widget_name.widget_keyword API), as well as data.
At this point, we’re almost ready to run the test scene to try our changes, but there’s something we need to do first: modify our test scene to support the changes we’ve made to our Debug API.
Adding a DebugContainer to the Test Scene
Let’s go straight to our TestScene scene and add one of our new DebugContainer nodes; name it “TestDebugContainer”. As a child of that, add a DebugTextList debug widget with the name “TextList1”. Finally, go to TestScene.gd and change our call to Debug.update_widget() to incorporate our new syntax for specifying the debug container in the widget_path.
func _process(_delta) -> void:
  # ...existing code
  elif test_ct == 900:
    Debug.update_widget('TestDebugContainer:TextList1.remove_label', { 'name': 'counter' })
  elif test_ct < 900:
    Debug.update_widget('TestDebugContainer:TextList1.add_label', { 'name': 'counter', 'value': str(test_ct) })
Now we can run the test scene and see our changes in action! If you press the debug toggle key combination we defined earlier (Shift + `), you should be able to see the same counting text that we saw before. Additionally, you should be able to see the tab we just added, titled "TestDebugContainer".
If that's what you see, good job! If not, review the tutorial (and perhaps the repo code) to try and identify where things went wrong.
Testing with Multiple Debug Containers
That said, these are things we've seen before (aside from the tab). We made these changes to support being able to show different debugging views via multiple debug containers. Let's go ahead and add another one!
Duplicate the TestDebugContainer node (which will create a copy of both that node and the child debug widget; the TestDebugContainer node will be automatically named "TestDebugContainer2"), then go to TestScene.gd and add two new calls to Debug.update_widget() as shown below:
# ...existing code
  elif test_ct == 900:
    Debug.update_widget('TestDebugContainer:TextList1.remove_label', { 'name': 'counter' })
    Debug.update_widget('TestDebugContainer2:TextList1.remove_label', { 'name': 'counter' })
  elif test_ct < 900:
    Debug.update_widget('TestDebugContainer:TextList1.add_label', { 'name': 'counter', 'value': str(test_ct) })
    Debug.update_widget('TestDebugContainer2:TextList1.add_label', { 'name': 'counter', 'value': str(round(test_ct / 10)) })
As you can see, we're simply changing the widget_path to request TestDebugContainer2 instead of TestDebugContainer. To keep the test simple, our second call is showing the same test_ct variable, but divided by ten and rounded to the nearest integer.
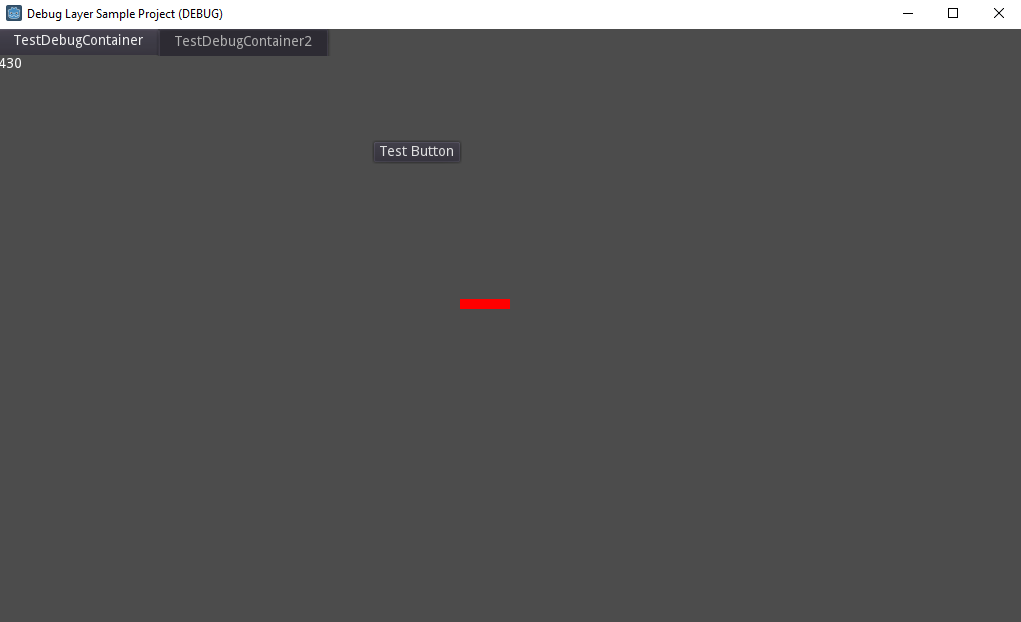
That's it! No, seriously! Go ahead and run the scene again, and everything should "just work". You'll see two tabs, one named "TestDebugContainer" and the other named "TestDebugContainer2". Switching between them will alternate between showing the original counter and the rounded version.
But wait, there's more! We can add these debug containers anywhere in our scene structure, and as long as those scenes are part of the currently-running scene tree they'll register themselves to our debugging interface.
To test this, let's create a quick child scene to add to our test scene. Create a new scene called "TestChild" (based on Node), then add a button with text "Test Button" and place it near the top-center of the child scene. Add a DebugContainer with DebugTextList child to TestChild, and make sure you rename them to "TestDebugContainer2" and "TextList1" (to match the widget_path we've defined in the TestScene.gd script). Instance TestChild into TestScene and remove the TestDebugContainer2 node that was in TestScene.
Run the test scene, and you get exactly the same result as before. You can see both the tabs, and switch between them with ease. The only difference is that one debug container originated in TestScene, and the other in TestChild.
If you see the
TestDebugContainer2tab, but not the counter, that means you forgot to make the debug node names and thewidget_keystring match, so you're not actually sending updates to the correct location.
Fixing One Last Bug
Before we get too hyped with excitement, however, there is a bug that we need to take care of. Run the test scene, open the debugging interface, and hover over the button we added to the TestChild scene. Nothing seems to happen, right? Now close the debugging interface and hover over the button again. This time, it lights up, indicating that it's receiving mouse events. That means something in our debugging interface is intercepting mouse events.
Fortunately, this is a simple fix: we just need to go to the DebugLayer scene and change the mouse_filter properties for DebugUIContainer, VBoxContainer, and DebugContentContainer to MOUSE_FILTER_IGNORE (shown as just Ignore in the editor interface). Do not, however, change the mouse_filter property for DebugTabs, or you may find yourself unable to click on the tabs at all!
Once you've made those changes, run the test scene again. This time, you should be able to trigger the button hover state when the debug interface is open.
Congratulations!
We now have DebugContainer nodes, which we can add wherever we want, and add whatever debug widgets we want to them, using the tabbed interface to switch between whichever debugging views we want to see. And best of all, it's simple to add these debug containers and widget as we need them, whether for temporarily reporting data or for permanent display of debugging information.
With these things, you have the essentials needed to build on this debugging system and make it your own. Create widgets that show you the information that you need to know. As shown in this tutorial, it's easy to make a new debug widget, and just as easy to register it to the debugging system. Using this system has definitely made my game development much easier, and I hope the same will be true for you!
If you want to see the code as it was at the end of this part, check out the tutorial-part-3 branch in the Github repo.